
Kayaking is an incredibly healthy form of exercise. If you’re paddling a kayak you’re pretty much guaranteed to be immersed in the natural world, far from the hustle and bustle of the modern world. Add camping into this equation and you have a match made in heaven. Previously, kayak camping has been the reserve of the sit-in kayaker. However, the relatively recent rise of the sit-on-top kayak has meant a corresponding rise in sit-on-top kayak camping. So, if you want to give kayak camping a go but only have a humble sit-on-top, don’t despair just yet. What you have already may be perfectly adequate.
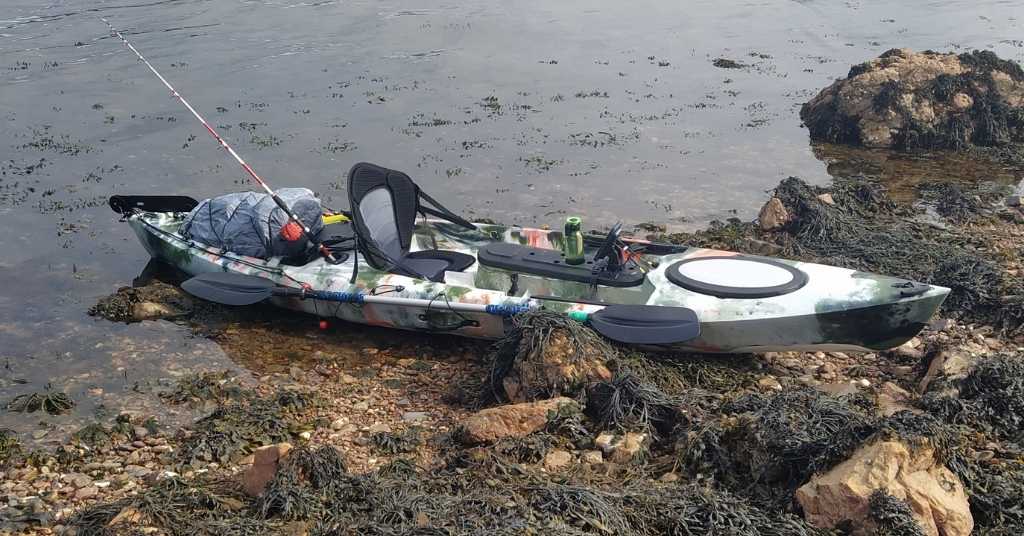
Table of Contents
Are sit-on-tops better than sit-ins for kayak camping
The answer to this question depends on a lot of different things. Most touring-type sit-ins though are definitely going to be faster and more suited to long-distance touring and camping than most sit-on-tops.
Sit-on-tops will be slower but more convenient. If you’re planning a slowish and relaxing journey with frequent stop-offs en route to your camping destination then a sit-on-top is definitely going to have its advantages. Hopping on and off a sit-on-top is easier than getting in and out of a sit-in.
So, in summary, if speed and distance are a priority for you then it’s probably best to go with a good touring type sit-in. For the rest of us, a decent sit-on-top with adequate storage capacity will do the job just fine.
How big does my sit-on-top need to be for kayak camping?
This depends on how much gear you want to bring, how long you intend to camp for, and how comfortable you want to be while you’re there.
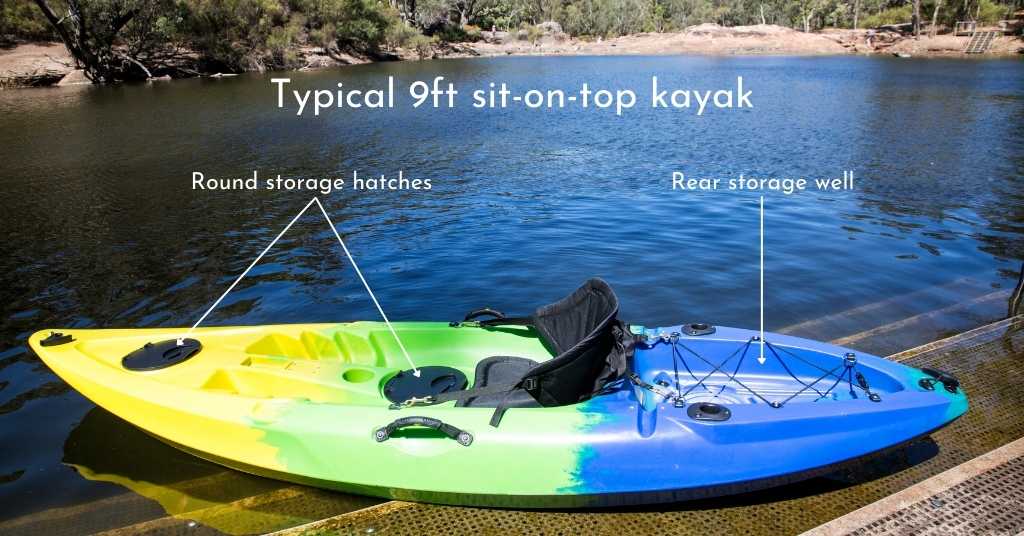
At a minimum, you’ll want a 9ft kayak. This also happens to be a very common beginner kayak length. Most kayaks of this size will have some sort of rear storage well behind the seat and perhaps a small sealed round hatch or two at the middle and front. In other words, storage space is at a premium on a 9ft kayak. However, with neat packing and compact gear, an overnighter somewhere should be perfectly feasible.
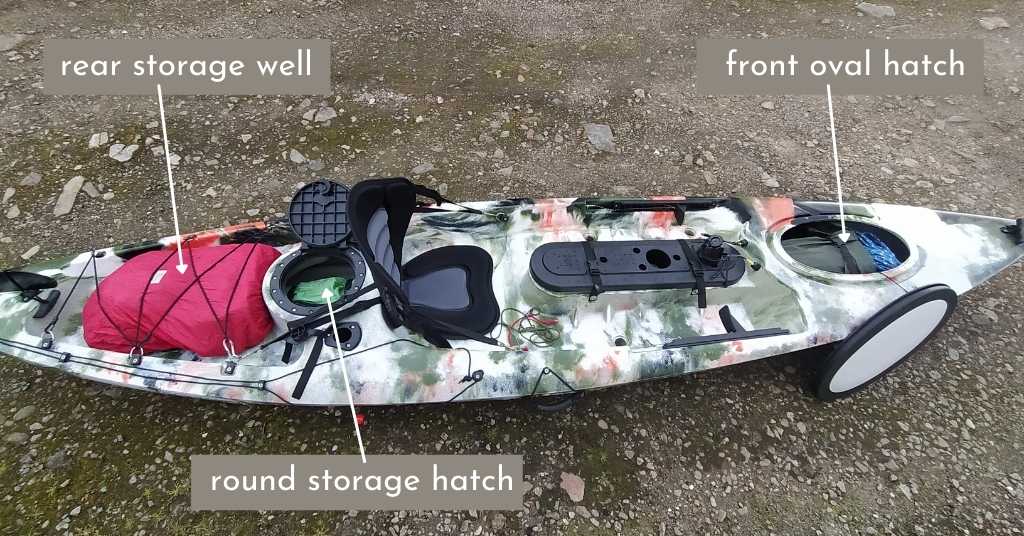
At the maximum end of the scale, a 14ft sit-on-top kayak should allow you to camp for a week if should you fancy it. These larger kayaks will generally have rear storage wells big enough to store a large backpack. Also, there will usually be an oval hatch at the front giving another pretty big storage area inside the kayak hull. As is that wasn’t enough there will quite likely also be 1 or 2 smaller quick-access round hatches located somewhere close to the seating area.
Personally, I have a 12ft sit-on-top kayak and I’ve found this to be an ideal size. It allows me to take as much gear as I need for 2-3 days if I want to.
The best sit-on-top kayak for camping?
I’m not going to recommend a particular brand or make of kayak here. There are loads of good options in that regard. Instead, let’s look at the essential characteristics you’ll want in your sit-on-top for going camping.
The best sit-on-top kayak for camping will have a good compromise between length, storage options, storage space, weight, and reliability/build quality.
A length of 12 -13 ft will give you the best compromise between available storage space and how heavy the kayak is. The weight of the kayak is important as it determines how easy or hard it will be to lug it around on dry land. Remember, it’s not going to be on the water the whole time.
You’ll also want to look out for a large oval front hatch, large rear storage well, and a smaller round day-hatch. These give the best options for storing and packing the gear you’ll need.
Last but certainly not least get something that feels sturdy, strong, and dependable. If it feels flimsy I wouldn’t get it. Loading your kayak up with camping gear will quickly reveal any weaknesses. That’s something you don’t want to experience.
Weight for length considerations
Something to keep in mind is the weight of the kayak itself. This inevitably increases as the length does.
Wherever you camp you’ll need your kayak on dry land and as close to you as possible. If your camping by the edge of a smooth sandy beach this won’t be an issue. However, if you need to haul your kayak over a rough stone beach, or rocky shoreline then a heavier kayak definitely will be an issue to consider, especially if going alone.
An unladen 10ft sit-on-top kayak will weigh somewhere around 20kg, my 12ft sit-on-top weighs 28kg, and a 14ft kayak is going to be something like 30-35kg.
Items you need for sit-on-top kayak camping
The things you’ll need to go kayak camping are –
- Water
- Food
- Shelter
- Sleeping equipment
- Cooking equipment
- On the kayak clothes
- At camp clothes
- Safety equipment
Item #1 Water
An essential item, you’ll need at least 3 liters per day. Water is heavy and space-consuming though and packing more than 10 liters will be unrealistic.
Short trips of 1-2 days will suit pre-packing enough to last. However, anything longer will ideally require gathering and purifying water at each campsite.
I take a roll-up 10-liter hangable water bag with a tap on it for gathering water as it takes up very little space in my pack when empty. In addition to this, I take a 2-liter bottle and an 800ml drink bottle. Firstly I fill the 10-liter bag from a freshwater source at each campsite. I purify that water as needed into the 2-liter bottle for cooking, drinking, filling my drink bottle for the next day, etc.
To purify the water I use the ‘Lifesaver Liberty’ compact water purification system. Check out my review here if you want to read more about it. There are loads of great compact filtration and/or purification systems out there though. In my opinion, they’re a great addition to any camping setup.
Item #2 Food
Unlike water, you will most likely have to bring all the food you require for the entire duration of your trip. Unless of course, you plan to fish, forage, or hunt along the way.
The primary things to consider when choosing food are how much space they consume, the nutritional value they provide, and their ability to stay fresh. If space is an issue rice and spaghetti are good options.
Ensure your food supply is kept in a secure dry bag to protect it from moisture, which could spoil it.
Item #3 Shelter
Any kind of small, good-quality tent will be fine. The two-man option will give more space for you and your gear and provide a comfier sleep. Make sure it’s waterproof in heavy rain, can be sealed against bugs if needed, and is fairly easy to put up and take back down.
A good lightweight tarp is also a good thing to take along if you have space. It can be used to provide additional overhead shelter for your campfire, cooking, lounging area. If you do bring a tarp make sure to bring sufficient cordage/rope to suspend and secure it.
Also, don’t forget some kind of light for illuminating your camp area when it gets dark.
Lastly, wherever you set up your shelter DO NOT pitch too close to the water. A sudden rise in water level, high tides, or sudden swell increase could see you and your kit going for an unexpected swim!

Item #4 Sleeping equipment
Get a warm sleeping bag, especially if you plan to camp in colder weather. Get the best bag you can afford. Waking up frozen every hour or two during the night is a quick way to take any pleasure from your excursion. A good and warm night’s sleep can be the difference between an amazing experience and a dreadful one!
In addition to a sleeping bag, you will also need a sleeping mat. The options are a basic closed-cell foam mat or some kind of inflating mat. I use a cheap self-inflating type of mat. any kind of inflating mat is going to be at risk of puncture. A basic foam mat will be less comfy but will be lighter and practically indestructible. You may want to bring a dedicated pillow too. Personally, I only ever use my jacket, hoodie, or some other item of clothing fashioned into a crude pillow.
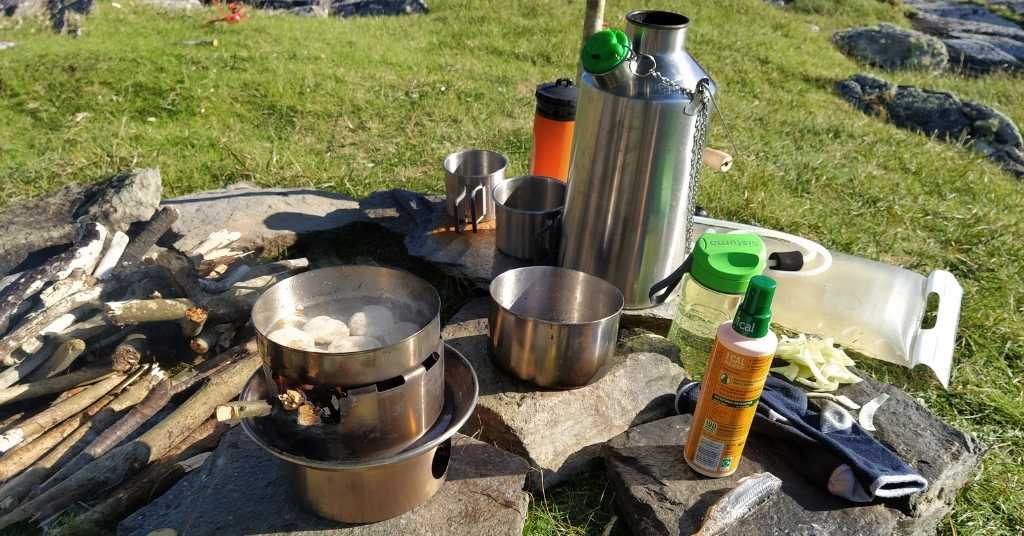
Item #5 Cooking equipment
Unless all the food you take requires no cooking, you will need some cooking equipment. This means utensils and a heat source. The heat source can be one of two main types. Ones that require you to bring your own fuel and ones that don’t. This can be a campfire, twig stove, gas burner, etc. Both types have their obvious advantages and disadvantages in terms of convenience or space-saving.
As well as a heat source you’ll need some utensils to cook and eat with. A small pot to cook food in, a kettle for boiling water, and a cup to drink from. A spoon and fork should suffice to eat with.
I personally use a ‘Kelly Kettle’ kit for my cooking needs and find it very good. Check out my review of the Kelly Kettle Ultimate Base Camp kit if you want more detail on it.
Item #6 On the kayak clothes
This will depend a lot on the weather, and you’re personal preference.
If it’s warm then anything that you don’t mind getting wet will be fine. Make sure it’s quick-drying though as you don’t want to be pulling on wet clothes to start kayaking the next morning. Bring a good jungle/boonie style hat too, they’re comfortable to wear and give good sun protection.
If it’s colder I would highly recommend a two-piece drysuit for safety and comfort. In addition, a warm hat and gloves will probably be needed too. Falling into cold water and getting soaked is a bad scenario, and one you want to avoid at all costs. It will very quickly lead to hypothermia, which is very dangerous. A drysuit will stop the clothes underneath it from getting wet until you get back into your kayak. The importance of this can’t be understated.
Item #7 At camp clothes
Bring some comfy clothes for wearing at your camp. It’ll make all the difference being able to get into some dry clothes after a long day spent paddling.
Typically the clothes I want at camp are as follows –
- Warm hat
- A good waterproof jacket
- Durable fast-dry cargo style trousers
- Bodywarmer
- Suitable footwear
In addition to the above be sure to pack enough undergarments for your duration, i.e. t-shirts, socks, and jocks.
Item #8 Safety equipment
This is an important section, especially for beginners to kayaking. It’s good practice to always have these on your kayak and not just kayak camping trips.
PFD
The number one safety item is your PFD (personal flotation device). Under no circumstances should you get on the water without it. Its purpose is to keep you afloat in the event you end up in the water.
If you get flipped you’ll likely be dealing with things like the shock of cold water, waves, currents, trying to flip your kayak right-side-up, grabbing gear, etc. Now imagine while trying to do all that you also have to keep yourself afloat because you aren’t wearing a PFD. That’s how things take a deadly turn. So, don’t take the chance and keep it on you at all times on the kayak.
Small first aid kit
For treating any injuries you may be unfortunate enough to receive.
Kayak bilge pump
If your sit-on-top kayak becomes internally flooded this will allow you to pump it out quickly. They can even be used on the water to get you out of a slow leak type situation.

A good knife
An important item in my opinion. It may be the only thing to free you from any kind of rope holding or pulling you underwater. This could happen in any number of scenarios. Make sure the knife is securely sheathed to your person. Also ensure it’s easy and instinctive to pull out in an emergency, and sharp enough to cut rope easily.
Phone in a waterproof case
Your phone can provide a vital lifeline in the event of an emergency. Get a good waterproof case to keep it in when you’re on the kayak.

Powerbank with charge cable
Your phone won’t be any good to you if the battery is dead. Bring some kind of backup power bank and/or some other method of charging too. Don’t forget the charging cable!
Duck tape
This can be used in an emergency to repair cracks or holes you might get in your hull. You’ll need to get the hull dry first though before applying. After that, you need to apply heat to it using direct sunlight or by waving a lighter flame over it. Duct tape also has a million other uses for other problems that might come up.
Paddle leash
A paddle leash attaches your paddle to the kayak. Should you end up dropping your paddle in the water it will prevent having to watch your paddle float away and becoming stranded.
*Note – There are situations where a paddle leash isn’t recommended such as whitewater and very fast-moving rivers. Leashes bring with them an entanglement risk which is high in very rough water. They are more suited for open water expedition scenarios where entanglement risk is low and losing your paddle will have grave consequences.
How to pack a sit-on-top kayak for camping
There are a few things to be aware of when packing your sit-on-top for kayak camping.
- Distribute the load between the front and back of the kayak.
- Balance the load between the left and right sides of the kayak.
- Don’t exceed the maximum load capacity of the kayak.
- Avoid packing the load too high
- Keep heavy items as low to the kayak as possible.
- Make sure the load is secured.
- Take steps to ensure the load stays dry.
Packing tip #1 Balance the load
The most important thing to be aware of is balancing the load between the front and back of the kayak. Avoid the situation where either the bow or stern is overly up or down looking in the water.
Making sure the load is also balanced between the left and right of the kayak. Ensure there isn’t a noticeable lean to one side or the other when the kayak is fully packed. Make sure any items packed inside the hull cant shift from left to right.
Packing tip #2 Don’t exceed the kayaks max capacity
The maximum load capacity of the kayak is something to be aware of too. Make sure you and your gear combined do not exceed that limit. Under normal circumstances, you shouldn’t be anywhere near the limit.
Packing tip #3 Heaviest items to the bottom of the kayak
Avoid packing the load too high. In particular, pack the heaviest items like your tent and so on, as close to the bottom of the kayak as possible. Heavy items packed high will raise the center of gravity and increases how easy the kayak can tip over. In addition, a high load will also increase wind resistance.
Packing tip #4 Secure the load and keep it dry
Make sure anything that isn’t packed inside the hull is well secured. Make sure fixing points, D-rings, and bungees are secure, strong, and not rotted. Also, ensure that any external load is secured well enough to survive the kayak flipping in the water.
Last but not least make sure you take the necessary steps to keep your load dry. Dry bags and ziplock bags are great options for keeping things dry. Always pack your gear as though it will be submerged, or exposed to large amounts of water. It’s going to be on a kayak after all! Imagine tipping your kayak, getting soaked, and then having no dry gear when you finally get to camp.
How to stay dry in a sit-on-top kayak
Keeping the water off you in a sit-on-top kayak is difficult if not near impossible! There are really only two ways to stay dry –
- Paddle low and slow.
- Wear a dry suit or some other kind of waterproof gear.
That’s it really and one is much more realistic than the other.
Keeping your paddle low and slow will stop the water from your paddle from falling on you. That’s where the majority of the water will come from. However, it’s seriously going to hamper your paddling technique and power output. It’s really only suitable if you’re going a very short distance in perfect weather which is kind of unlikely if you’re going kayak camping! Plus if it rains, gets windy, or gets choppy then you’re kind of screwed anyway.
A waterproof jacket and trousers will keep you dry to a point. I have found from experience though that the water eventually works its way in eventually through the collar, cuffs, and the gap between trousers and coat. It will definitely keep you drier than nothing though and much more cost-effective than a full-on dry suit.
The best way to keep yourself dry on a sit-on-top kayak though is to wear a dry suit. All possible entry points are sealed so you’re more or less sure to stay dry even if you capsize and submerge. A drysuit also has a valuable safety element to it, particularly if kayaking in colder waters.
A dry suit can be too hot to wear in very warm weather though. In those kinds of conditions you won’t really need it you will honestly welcome getting wet.
Suitable waters for sit-on-top kayak camping
There are two places where a sit-on-top kayak doesn’t suit and won’t perform well –
- Open sea
- Very fast-moving water
In general, those are risk-filled environments anyway, even for an experienced sit-in kayaker. The open sea or very fast-moving water is not somewhere to try out sit-on-top kayak camping for the first time.
Good places to try sit-on-top kayak camping –
- Large lakes
- Coastal inlets
- Smaller bays
- Wide slow-moving rivers
Coastal sea waters are doable as long as you keep close enough to shore and the wind and swell aren’t too strong. The risks increase exponentially as you move away from the shore and further into the open sea. To begin with I would stick with smaller bays and coastal inlets.
*Note – Be aware that coastal inlets do contain currents as they fill and empty with the tides. Between narrow channels of land, these currents can get fast enough not to be able to paddle against. As such the direction and timing of your journey may need to coincide with the direction and times of the tides.
Larger lakes are great places to try sit-on-top kayak camping. Although no body of water is 100% safe, lakes are about as safe as it gets by having shoreline all around you. Wind and chop will be the main safety concerns on a lake.
Wide slow-moving rivers should also be ok for sit-on-top kayaking. Anything whitewater or very fast-flowing should be avoided.
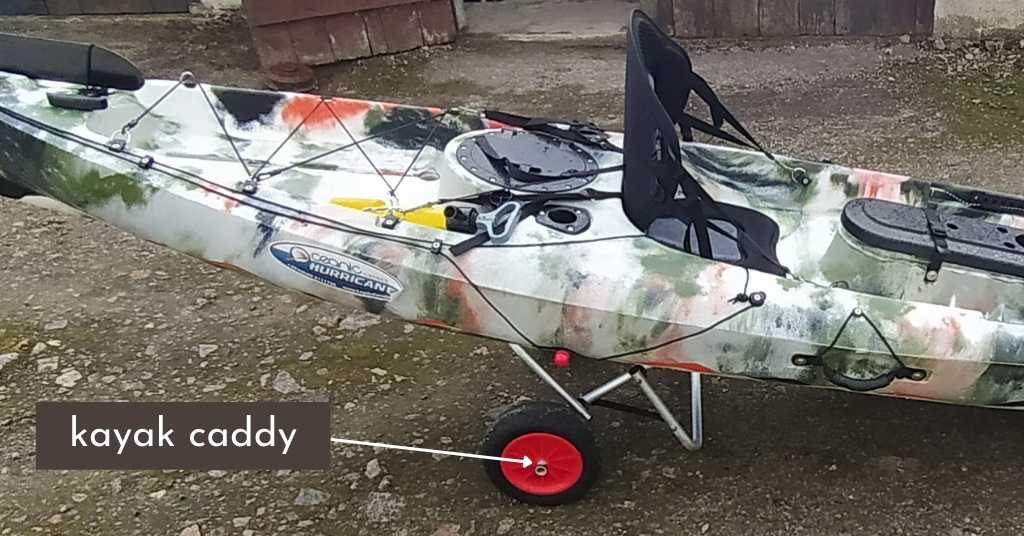
Transporting your sit-on-top kayak
I’m talking here about getting from your car or campsite to the water’s edge and back. This could be a considerable distance depending on where you launch from or where you land into. A small and lightweight kayak caddy is what’s needed for this specific job. It allows you to bring your fully-loaded kayak as close to the water and back as possible.
They are more applicable to larger sit-on-top kayaks which are heavier and have the room to store a caddy. Fortunately smaller kayaks are lighter anyway and much easier to carry. You just might have to do two or three trips to get all your gear and kayak to where you need it.
Kayak camping and the weather
Touring-style sit-on-top kayaking, in general, is very dependent on the wind level. The limit for me in terms of wind speed is 10 knots or level 3 on the Beaufort Force Scale.
I use Windy.com to check weather conditions and plan a trip. It gives info on the wind, waves, swell, and other general weather conditions. I do a lot of coastal kayaking, and from experience, I have found anything showing wind of more than 10 knots, and swell of more than 1.5m is not worth going out in. It’s simply not enjoyable and starts to become dangerous.
Multi-day kayak camping is not the sort of thing where you can arrange very specific dates in advance. This can lead to going out in dangerous conditions if the weather doesn’t suit your dates. For multi-day day trips, you need to be ready to go at short notice of 1 – 2 days max when an acceptable weather window comes up.
Always be prepared to cancel if the weather doesn’t play ball and changes shortly before. It may not feel like it at the time but it’s better to be a little (or very) disappointed, than finding yourself in serious trouble on the water. Remember, a suitable weather window will come another day.

Conclusion
Kayak camping is great fun and a truly unique experience. The sense of adventure and exploration that can be had is hard to match. The fact you can do it on your sit-on-top, even a smaller one, means it’s within easy reach of anyone if you really want to. Once you try it you’ll be hooked and being hooked on something like kayak camping is no bad thing. It will benefit your health and wellbeing in so many ways.
Just remember to respect the water and the power of nature and always think safety first.
As always, feel free to leave a comment if you have any thoughts, advice, questions, or opinions related to this article.
2 replies to "Sit on top kayak camping: A beginner’s guide"
Thank Michael,
That was a very interesting and informative guide.
I have learnt a lot from that.
Now looking forward to seeing if i can kayak, The Great Glen Way in Scotland
Thanks Paul, No problem at all, I’m so glad you found it useful.
Best of luck on the Great Glen Way, it sounds amazing.
Kayak camping really is an amazing experience and well worth the extra effort.